Find one that got you laughing out loud or one that touched your heart? It's only natural for us social media addicts to be sharing these content with our friends so go ahead and spread those viral-worthy stories you discover on Churp Churp through your social media platforms Like these posts with the Facebook button or share it with your friends via Twitter.
Get your fastest growing Broadband to run even faster! Boost your Globe Tattoo Stick’s Internet speed with this quick and easy guide. The simple steps will make your Globe Tattoo Broadband look for a faster and stronger 3G connection, so you can enjoy surfing to the max.
Cproxy reupdate by changing the UDPport53 to UDPport137 because UDPport53 is block By Internet Service Provider! Yup that's true, udpPort53 is block by globe telecom.
Do you have a lower version of windows 7 in your computer that comes pre installed such as Starter and Home Basic?
Well, it is not so cool to have those versions..
Want to upgrade without formating? Then read below: Windows Anytime Upgrade
The Windows 7 version of Windows Anytime Upgrade introduced many improvements, notably the upgrade time has been reduced to around 10 to 20 minutes, and upgrade license keys can be purchased at retail.
The benefit of WAU is that if one decides that one wants Windows Media Center, Aero, or Windows Fax and Scan out of a computer that currently runs the Home Basic edition, one could complete the upgrade without needing to acquire a different installation disk and without requiring a reinstall of Windows.
Note: Before doing this I suggest you to unplug completely your pc/laptop from internet connection. If you're using wifi, disable it and don't allow it to connect automatically. Why? Because I'll be providing upgrade keys that are leaked and I'm not the owner of those keys(might be hunted by microsoft). I'll be only sharing the keys, so credits goes to those who shared it first and posted it in the internet.
Please make sure your computer is in good condition for the process to work flawlessly.
Ensure that if you're using a laptop it is connected to an electric outlet.
Try at your own Risk if you'll be using the keys uploaded!
This is the step-by-step of going through an upgrade from a lower edition of Windows 7 to a higher edition of Windows 7.
STEP 1:
Launch Windows Anytime Upgrade (WAU) from Windows 7, you may click Start, type windows anytime upgrade in the search bar.., presented with 2 options: purchase a WAU product key online or enter a WAU product key from a WAU retail package purchased in a store. Choose Enter a WAU key.
STEP 2:
Enter WAU product key.(in the text file uploaded).
STEP 3:
The WAU product key that is entered will be verified as valid(hopefully).
This image has been resized. Click this bar to view the full image. The original image is sized 750x562.
STEP 4: Accept license terms to proceed.
STEP 5:
You will be asked to save your work and close all programs. To proceed, click the "Upgrade" button.
This image has been resized. Click this bar to view the full image. The original image is sized 802x540.
STEP 6:
The upgrade takes place! The PC will reboot many times until it is done.
STEP 7:
The upgrade finishes and the computer is now running the version of Windows 7 you upgraded to with all its features!
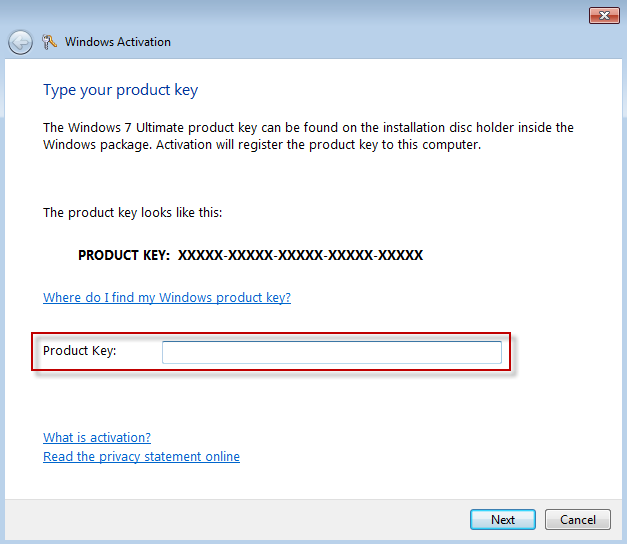
After doing the upgrade, chances are you will need to ReActivate windows with the respected key.
To do this, click Start, type Activate Windows in the search box, enter the respective Activation key,
click Activate Windows Online
(note: you must still not connected to the internet when doing this).
The Activation was successful should appear hopefully.
Then you may restart your pc.
Now you can try to connect to the internet to get updates if available.
Activation could go wrong when using the keys, it is because your windows has been updated and installed KB971033 from windows update..
so, then please use the Loader attached to activate Windows. Download, extract, Install,
then wait for it,
computer restarts, then your good!
This image has been resized. Click this bar to view the full image. The original image is sized 820x592.
Note: Upgrade with this pattern..
Starter/HomeBasic to Home Premium
Home Premium to Professional
or
Home Premuim to Ultimate
You can not Jump from Starter/HomeBasic to Professional or Ultimate, Starter/HomeBasic should first upgrade to Home Premium to upgrade to the higher versions. Note: Uninstall update or hide(if not yet installed) KB971033 from Windows Update You can use the loader:
1. To activate Windows
or
2. Use the Loader when flagged as non genuine!
Guys i see this in popular forums in ph but its and old posted. so i will share it.
pau001 say: I tried over 30 tutorial and none of them worked until i search for a packet capture for intel 5100 and 5300.
About 85% of this tutorial is mines, the other 15% is a tut I used to install Aircrack(windows version).
This is a long tut, but it is worth it. Some cards don't work on
backtrack/ ubuntu, and the need to download vmware then install, takes a
extra 3+
I'm using a lenovo y550p ideapad(4gb ram)/intel 5300 built-in.
Works on all pcs with supported cards, link to supported cards are at bottom.
I added intel 5100\5300 in title, because of non support by other wep
packet captures. You can use intel 5100\5300 on ubuntu and backtrack,but
there is alot of steps which I can't still figure out.
INSTALLATION:
1.Install commview 6.2, install like any other regular program.
2. extract aircrack zip file to root, which is "C" for most computers
3.now extract peek zip file to the bin folder which is in aircrack like this C:\aircrack folder\bin.
4. and extract dll file to bin folder also.
You will be overwriting some files, just click yes to overwrite them.
I recommend making a shortcut for aircrack GUI.exe, because your going to use it alot.
Now go take a 5 minute break.
OK back from break? Now get ready
Real WEP capturing steps:
1. open commview 6.2 and click the M and the C to shade them and then click play.(The D should be unshaded )
2.Now click start scan, choose band "i use the b/g/n" and then click capture don't worry.
3.Now wait about 2 minutes and right click and copy mac address of the wep network with the most packets or best signal.
4. Enable MAC address rules, action: capture, add record: both, paste
mac address, then click add mac address(look like pic except the mac
address, will be different)
5. Final steps in configuration
Click logging tab, make sure auto saving is checked, and increase size
to 150 or higher, this can be adjusted later and leave logs directory as
is.(I did 1,000,000 mb = 1GB, because of capturing 13
NOW WAIT until you get about 1million through 2 million packets, or just record overnight for atleast 2 night. Then continue.
AS you can see I have collected keys for about 1 week on and off, becuase of torrent download
PART 2
1.click logging tab and save all packets in buffer, then click
concatenate Logs. and select all logs and save in folder.(I saved in a
new folder called binded and you can see theere from different days)
2. Open log viewer, by pressing ctlr+L or going to file in top right corner.
3.Load commview logs, should look like this pics when loaded.(I have 189518 keys, out of almost 2 millon packets )
4. now go to file and click export logs and to the bottom of drop box
click wireshark/tcp dump format. now give this file a name, something
easy to remember.
5. Your done with commview, but i recommend to leave open to get more packets just in case.
PART 3
1. Open aircrack GUI.exe
2. now click choose, and go find the .cap file you saved.
3.click launch and click the one you want, i wanted the first one so i
choose 1 and press enter.(this step is only for people with multiple
networks)
4. now wait and you should get this.
PICTURE:http://i40.tinypic.com/1z1uvkz.jpg
5. now right click and select all and press enter and save to notepad.
or connect and enter key without colon in wep password box.
1. Type "about :config" in the adress field.
2. Set the
value of network.http.pipelining to "true".
3. Set the value of
network.http.pipelining.maxrequests to "100".
4. Set the value of
network.http.proxy.pipelining to "true"
5. Set the value of
nglayout.initialpaint.delay to "0" (not availible in newer versions)
Sometimes when you are executing some program an error comes saying that your xxx file is corrupted so we can not run your program and your whole work is left pending due to that error. Now this problem will not arise because I will show you how to fix these corrupted files.
Required:
1. Windows XP operating system
2. Windows XP cd
Now, follow this steps:
1. Place the xp cd in your cd/dvd drive
2. Go to start
3. run
4. type in 'sfc /scannow' (without the ')
Now it should all load, and fix all your corrupted file on win XP.
Free Access To Websites Without Registering
Go to
-http://bugmenot.com/
and type the URL of the website you want to log into.
Examples:
-http://www.nytimes.com/, -http://www.winnetmag.com/
etcetera.
Another (and better) way is changing the user agent of your browser to:
Googlebot/2.1+
-http://www.googlebot.com/bot.html
This is very easy in Mozilla's Firefox. Download and install the User Agent Switcher from
-http://www.chrispederick.com/work/firefox/useragentswitcher/
and add the Googlebot user agent.
Every time windows is about to boot, you can press F8 and change the boot options:
Safe Mode, Safe Mode with command prompt and normal boot.
Before booting, press F8. The Windows login screen will show another account: Administrator
If the owner of the PC forgot to put a password to the main administrator, you can access that account and remove the others' passwords, or do all the changes from there so that nobody will know it was you.
Deep inside the bowels of Windows Vista & Windows 7, there’s a secret Administrator account, and it’s different from the normal administrator account you most likely have set up on your PC. This Administrator account is not part of the Administrator group. (Confused yet? You should be.) It’s a kind of superadministrator, akin to the root account in Unix, and by default it’s turned off and hidden. (In describing this tut, I’ll always use the capital “A” for the secret Administrator account, and a lowercase “a” for a normal administrator account.)
In versions of Windows before Windows Vista, the Administrator account wasn’t hidden, and many people used it as their main or only account. This Administrator account had full rights over the computer.
In Windows Vista & Windows 7, Microsoft changed that. In Vista & 7, the Administrator account is not subject to UAC, but normal administrator accounts are. So the Administrator can make any changes to the system and will see no UAC prompts.
Turning on the Administrator account is straightforward. First, open command prompt (cmd), opening it as Administrator (VERY important).
Then enter this command and press Enter:
Net user administrator /active:yes
From now on, the Administrator account will appear as an option on the Welcome screen, along with any user accounts you may have set up. Use it like any other account. Be aware that it won’t have a password yet, so it’s a good idea to set a password for it.
If you want to disable the account and hide it, enter this command at an elevated command prompt and press Enter:
Net user administrator /active:no
Before you spend a time on security, there are many precautions you can take that will protect you against the most common threats.
1. Check Windows Update and Office Update regularly (_http://office.microsoft.com/productupdates); have your Office CD ready. Windows Me, 2000, and XP users can configure automatic updates. Click on the Automatic Updates tab in the System control panel and choose the appropriate options.
2. Install a personal firewall. Both SyGate (_www.sygate.com) and ZoneAlarm (_www.zonelabs.com) offer free versions.
3. Install a free spyware blocker. Our Editors' Choice ("Spyware," April 22) was SpyBot Search & Destroy (_http://security.kolla.de). SpyBot is also paranoid and ruthless in hunting out tracking cookies.
4. Block pop-up spam messages in Windows NT, 2000, or XP by disabling the Windows Messenger service (this is unrelated to the instant messaging program). Open Control Panel | Administrative Tools | Services and you'll see Messenger. Right-click and go to Properties. Set Start-up Type to Disabled and press the Stop button. Bye-bye, spam pop-ups! Any good firewall will also stop them.
5. Use strong passwords and change them periodically. Passwords should have at least seven characters; use letters and numbers and have at least one symbol. A decent example would be f8izKro@l. This will make it much harder for anyone to gain access to your accounts.
6. If you're using Outlook or Outlook Express, use the current version or one with the Outlook Security Update installed. The update and current versions patch numerous vulnerabilities.
7. Buy antivirus software and keep it up to date. If you're not willing to pay, try Grisoft AVG Free Edition (Grisoft Inc., www.grisoft.com). And doublecheck your AV with the free, online-only scanners available at www.pandasoftware.com/activescan and _http://housecall.trendmicro.com.
8. If you have a wireless network, turn on the security features: Use MAC filtering, turn off SSID broadcast, and even use WEP with the biggest key you can get. For more, check out our wireless section or see the expanded coverage in Your Unwired World in our next issue.
9. Join a respectable e-mail security list, such as the one found at our own Security Supersite at _http://security.ziffdavis.com, so that you learn about emerging threats quickly and can take proper precautions.
10. Be skeptical of things on the Internet. Don't assume that e-mail "From:" a particular person is actually from that person until you have further reason to believe it's that person. Don't assume that an attachment is what it says it is. Don't give out your password to anyone, even if that person claims to be from "support."
This is the 3rd tutorial of our "Master Tutorial" series. We have already posted 2 other tutorials for Windows XP and Windows Vista in past and now its turn of Windows 7.
Although Windows 7 is already very fast and reliable but this tutorial will help you in getting the max performance out of your system.
So without wasting any time, here we start our tutorial:
1. Registry Tweaks:
Following topic contains a few registry tweaks to optimize your system performance and add a few useful extras:
Collection of Registry Tweaks for Windows 7
You just need to download the ZIP file, extract it and run the file. It'll ask for confirmation, accept it. Restart your system to take affect.
2. Right-click on Computer icon on Desktop and select Properties (or press WIN + Pause/Break keys). Now click on Advanced system settings link in left side pane (You can open it directly by giving sysdm.cpl command in RUN or start menu search box). Now click on Settings button in Performance section:
It'll open another window. Disable all unnecessary options in Visual Effects tab, you can leave following options enabled according to your requirements:
* Enable Aero Peek (If you want to use Aero Peek feature)
* Enable desktop composition (If you want to use Windows Aero theme)
* Enable transparent glass (If you want to use transparency in Windows)
* Show thumbnails instead of icons (If you want to show thumbnails in Explorer)
* Show window contents while dragging (If you want windows to show contents while moving them)
* Smooth edges of screen fonts (If you want to show smooth fonts)
* Use drop shadows for icon labels on the desktop (If you want to show shadows under desktop icon labels)
* Use visual styles on windows and buttons (If you want to use Windows Aero or Basic theme)
3. Open Windows Explorer and go to "Organize -> Folder and Search Options" and click on "View" tab.
Now disable following options:
* Display file size information in folder tips
* Hide extensions for known file types
* Show encrypted or compressed NTFS files in color
* Show pop-up description for folder and desktop items
4. Right-click on Computer icon on Desktop and select Manage (You can also open it directly by giving services.msc command in RUN or start menu search box).
Now go to Services & Applications -> Services. Here you can set a few unnecessary services to Manual, so that these services don't start automatically with Windows and you can get a faster startup.
Visit following tutorial to know which services can be set to MANUAL to increase system performance:
Windows 7 Services that can be Safely set to MANUAL
5. Type msconfig in RUN or Startmenu search box and press Enter. Now go to Startup tab and disable unwanted startup entries. You can disable your graphics card's driver utility, Sound Card utility, etc to speed up the system startup and to increase system performance.
6. Open Sound applet in Control Panel (or type mmsys.cpl in RUN or Startmenu search box and press Enter). Now go to Sounds tab and select No Sounds from Sound Scheme section. You can keep some of your favorite sounds enabled but make sure to set Exit Windows, Windows Log off, Windows Logon and Start Navigation to (None).
Also disable "Play Windows Startup sound" option to disable the sound clip which is played at login screen.
7. Also don't forget to:
* Defrag the hard disk regularly
* Install only necessary software
* Use the latest device drivers
* Keep your Windows up-to-date
*Eliminate unwanted programs from boot up:
You will find that many of the programs you install on your system set portions of themselves to run automatically when you start up your computer. Each program that runs on startup not only consume system resources but also extends the length of time it takes your PC to fully boot.Since it is generally unnecessary to have any programs running in the background (other than security software like virus-scanners or firewalls) disable your unwanted startup programs to increase your startup speed and conserve system resources.
The easiest way to go about this task is to use the MSCONFIG utility, which may be familiar to users of Windows 9x. This handy program contains a list of software which is set to start when you boot your PC. You can then easily disable and re-enable (if necessary) these items.
Go to ’start\run’ and type ‘msconfig’ to access the utility.
The ’startup’ tab in MSCONFIG provides access to several other applications that are started at boot up and are running in the background. By examining their Filenames and directories, you should be able to get a feeling for what is necessary and what is not.
Be aware than several viruses and worms have a habit of disguising themselves with authoritative sounding Windows system file names, such as the Win32.spybot.worm as MSCONFIG32.EXE. Leave these for now if you are not sure.
The next place you should go is ’start\programs\startup’ which is a directory Windows XP uses to launch application shortcuts on boot-up.
If you remove the shortcuts from this directory, the applications will not load on startup. This directory can also be a repository for various badness such as spyware and virus software, so if there are files here which are not shortcuts and you don’t recognize them, you may wish to consider removing them anyways, as Windows will not place critical files in this directory.
* Eliminate unwanted fonts to increase boot speed:
The Windows XP control panel contains a ‘fonts’ directory which holds all the fonts currently installed on your system. These can come from Windows itself or from an application such as Word.Windows checks and loads these fonts during the startup process, therefore having a large amount of font files can cause performance to drag during startup. The simple solution for this (if you do not expect to use the majority of these fonts constantly) is to move the unnecessary fonts to a new directory elsewhere on the hard disk, preserving them in case they are needed, but preventing them from loading upon startup.To do this:
Create a new directory called ‘font backup’ or something similar on your C: drive.
Go to ’start\control panel\fonts’ and select all fonts. Drag and drop all the fonts into the backup folder you just created. Things will get garbled for a moment, never fear. Windows XP will automatically re-install the base fonts that it needs to display text into the fonts folder in a second or two.
Now you have the bare minimum of fonts installed. Go through the backup folder and cherry pick the fonts that you are sure to use (like Times New Roman or Arial).
If you removed a large volume of fonts, your system should now boot faster.
* Turn off BIOS disk detection:
Most modern motherboards will attempt to detect any IDE devices, such as hard drives and CD drives, during the POST sequence each time the computer boots. By configuring the BIOS with the correct drive information, you can shave a few seconds off your boot time by avoiding this detection process.To do this enter your system’s BIOS setup screen.Depending on your motherboard, you may have an IDE drive auto-detection menu. If you do, simply select it to automatically set your drives. If not, configure the drives through the ’standard CMOS settings’ menu.
Note that some motherboard chipsets (like Nvidia’s Nforce 2) do not allow this auto-detection to be disabled.
* Use the Intel application accelerator:
If your computer has an older Intel chipset (pre-865) you may benefit from downloading and installing the Intel Application Accelerator .This software replaces the Windows XP ATA (hard disk and IDE device) drivers with ones specially designed for Intel chipsets, improving disk performance and boot time.Please make sure that your computer conforms to the system requirements before installing the accelerator.
* Disable unneeded devices in device manager:
A quick fix that can make XP boot faster is to disable any unused devices in the Windows XP device manager. For example if you have a integrated sound card or video card that you have upgraded, or if you do not use a floppy drive on your system, it pays to disable these devices in device manager.The same goes for extra network cards. Of course, the standard rule of thumb applies here: If you do not know what it is, leave it alone.To disable unneeded devices in device manager:
Right click on ‘my computer’ and select ‘properties.’ From the ‘hardware’ tab, select ‘device manager.’ Expand the various categories to locate unused devices. Right click the devices and select ‘disable.’
* Disable auto detection for empty IDE slots:
Another quick trick for a faster boot up is to disable the auto detection that Windows XP uses to determine if there are IDE devices present in any of the IDE slots on the motherboard. More specifically, disable this feature on any empty slots to prevent the operating system wasting time and resources checking them.Right click on ‘my computer’ and select ‘properties.’ Go to the ‘hardware’ tab and select ‘device manager’ to open the device management window.Expand ‘IDE ATA/ATAPI controllers’ and highlight the ‘primary IDE channel.’ Right click the highlighted entry and select ‘properties.’ Go to the ‘advanced settings’ tab.
If either IDE slot on the controller is empty, the ‘device type’ dropdown box will be not grayed out. Set it to ‘none’ to disable auto detection of IDE devices on that particular slot.
Repeat the above steps for the ’secondary IDE controller.’
Note that if you wish to add a new IDE device, you will have to reset the ‘device type’ setting to ‘autodetect’ in order for Windows to use the new drive.
* Reduce wait time after XP boots:
A common performance problem with Windows XP is ’start lag,’ in which the operating system boots up normally, the desktop is visible and usable, but programs will not start, and selecting icons and using the start menu are extremely slow. This can take anywhere from a few seconds to a couple of minutes to clear up, and can make using the operating system extremely frustrating, especially if you are in a hurry after the reboot.This delay is generally caused by Windows XP’s networking services looking for other computers and advertising their functions over the computer’s network connections.
If this problem is driving you nuts, there is a way to reduce or eliminate the delay, though if you are attached to a home network, it will reduce your computer’s functionality on that network.
If your computer is not attached to a home network:
Right click on ‘my computer’ and select ‘manage.’
Expand ’services and applications’ and select ’services’ to open the services window.
Highlight the ‘workstation’ service, right click and select ‘properties.’ Set the ’startup type’ dropdown box to ‘disabled.’ Click ‘ok.’
Note that you will need to re-enable the workstation service should you wish to network your PC in the future.
If your computer is part of a home network:
Go to ’start\control panel\network and internet connections\network connections.’
Right click your current network connection (should be ‘local area connection’ unless you have more than one network adaptor) and select ‘properties.’
Uncheck the ‘File and Print Sharing’ box and press ‘ok.’
Note that this will disable your computer’s ability to share files and printers over the network, though it should not affect your ability to access such resources on another system.
*GREATLY INCREASE YOUR VIRTUAL RAM:
This makes your computer faster by using part of your HD space as virtual RAM. (Takes around a gigabyte of space,when initialized. but still speeds up your computer greatly!)
If your HD has less than 20GB of free space left then don't do this.
Alright, this is how you do it:
Instructions:
1. Right Click on "My Computer" icon and select "Properties".
2. Click on the Advanced tab.
3. Under Performance, click Settings.
4. Then click the Advanced tab on the button that pops up.
5. Under Virtual Memory at the bottom, click Change.
6. Click the Custom Size button.
7. For the initial size (depending on your HD space), type in anywhere from 1000-1500 (although i use 4000), and for the Maximum size type in anywhere from 2000-2500 (although i use 6000).
8. Click Set, and then exit out of all of the Windows.
9. Finally, restart your computer.
10. You now have a faster computer and 1-2gb of virtual RAM!
I did this personally and it worked great for me.
in the right side you will see SecondLevelDataCache clik modifier and change it to .....
writ 256 if your processeur is
Intel pentium 3 E
Pentium 4
AMD k6-3
AMD Thunderbird
Cyrix 3
Pentium 2 Mobile
writ 64 if your processeur
AMD Duron
writ 512 if your processeur is
AMD K6-2
Pentium 2
Pentium 3 Katmai
AMD Athlon
writ 1024 if your processeur is :
Pentium 2 Xeon
Pentium 3 Xeon
and 128 for processeur
Pentium Celeron
Pentium Celeron 2
THIS IS FOR NEW COMPUTER!
Actually this tweak is completely useless on newer computers, all it does is set the L2 cache size. Here's a better explanation of it:
Myth - "Adjusting the SecondLevelDataCache Registry value to match your CPU's L2 Cache size will improve performance."
Reality - "If you do not set this registry value, Windows will use the HAL (Hardware Abstraction Layer) for retrieval of the L2 cache size automatically on boot up. If this fails, a default value of 256KB is used. This is where the myth that XP can only use 256KB of L2 cache comes from. But it's false. The SecondLevelDataCache is designed as a secondary source of cache size information for computers on which the HAL cannot detect the L2 cache.
The HAL is able to retrieve the L2 cache size from any CPU using the set-associative cache design (Pentium II or newer), it's only the relatively few older processors with direct-mapped L2 caches that the HAL will not recognize. This tweak only applies to older computers (Pentium I or older) with over 64MB of memory. On these older systems, this tweak can improve performance by about 0.4%. Pentium II and later CPUs are not affected."
Open Regedit by clicking Start>Run and type in regedit.
Once Regedit is open, click the plus symbol next to the HKEY_CURRENT_USER folder, the plus symbol next to Control Panel, and then click the Desktop folder icon to display its contents. In the right pane, double-click MenuShowDelay to change its value. (This Registry location is referred to as HKEY_CURRENT_USER\CONTROL\PANEL\DESKTOP\MENUSHOWDE LAY.) The default Value Data is 400, or 4/10 of a second. Change the Value Data to 0 for the least delay, and click OK. This will make menus appear instantly on your computer instead of having a delay.
Open HKEY_LOCAL_MACHINE\SYSTEM\CURRENTCONTROLSET\CONTRO L\FILESYSTEM. Right-click Filesystem, select New, and DWORD Value. Rename NewValue#1 on the right-side pane to DisableNTFSLast-AccessUpdate. Double-click this new entry, change the Value Data field from 0 to 1, and then click OK. This disables the constant updating of the dates when a file or folder were last updated. This will speed up the system.
Open HKEY_CURRENT_USER\SOFTWARE\MICROSOFT\WINDOWS\CURRE NTVERSION\EXPLORER. Create a new DWORD Value called DesktopProcess, and set its Value Data to 1.
Expand HKEY_CURRENT_USER, expand Control Panel, and click Desktop. Double-click the AutoEndTasks string and change the value to 1. This causes all of the components of the explorer to run in one process, making your computer faster.
There is a caveat for some users here. Do not make this change if you are not running at least a Pentium processor and 16 MB of physical memory.
Expand HKEY_LOCAL_MACHINE, expand SOFTWARE, expand Microsoft, expand Windows, and expand CurrentVersion. Right-click Explorer, expand New, click Key, and name the new key AlwaysUnloadDLL. Click AlwaysUnloadDLL, double-click the Default string, and change the value to 1. Windows tries to keep some DLL's in memory when the program uses them. If a user has low memory, this can cause performance issues.
Expand HKEY_CURRENT_USER, expand Control Panel, and click Desktop. Double-click the HungAppTimeout string and change the value to 1000. Now, double-click the WaitToKillAppTimeout, string and change the value to 2000. This sets your system up to more efficiently handle application hangups. It also will optimize the amount of time a system takes to close a program when you try to end Windows.
Expand HKEY_LOCAL_MACHINE, expand System, expand CurrentControlSet, and click Control. Double-click the WaitToKillServiceTimeout string and change the value to 2000. This optimizes the time that it will take for Windows Services to close when the system is set to shut down.
Expand HKEY_CURRENT_USER, expand Control Panel, click Desktop, and double-click the MenuShowDelay string in the right-hand pane. Change the value to 100. This will cause Desktop menus to appear almost instantly.
Close regedit.
Set Recycle Bin to 1-3 percent of the hard drive space. To do this, right click on the Recycle Bin. Select properties. Move the slider down to the desired amount and click Ok. By default, the Recycle bin takes up too much of your space.
Turning On you PC in Just few seconds:
1. Go to start up hit “RUN” then type “REGEDIT”
2. Look for the key HKEY_LOCAL_MECHINE\SYSTEM\CurrentControlSet\Control\ContentIndex
3. After look again for the key called “ Statup Delay” double click on it
4. Now where its base click the decimal value the default is “4800000” “75300:hexdecimal”
5. Change the value to 40000 and you done.
Note: that this trick only works only to “not modified operating system” or what I call it as “chop-chop OS”
Shutdown Tricks here’s how:
1. Go to task manager press “CTRL + ALT + DELETE”
2. Select the shutdown tab & press “CTRL” key while selecting “TURN OFF”
3. and by in counting few seconds your windows rapidly safe shutdown.
Other Trick to Speed up shut downing:
1. Go to startup then press “R” that navigate you to “run box” then type “REGEDIT”
2. Then look for this key HKEY_LOCAL_MACHINE/SYSTEM/CurrentControlSet/Control
3. Click on the “CONTROL” folder, then select “WaitToKillServiceTimeout”
4. Right Click on it and select modify & set Value lower that 2000 “e.g. 100” and you done!
There is a registry hack to enable or disable Windows NT TaskManager. The same registry hack applies to Windows 2000 and Windows XP.
Hive: HKEY_CURRENT_USER
Key: Software\Microsoft\Windows\CurrentVersion\Policies\System
Name: DisableTaskMgr
Type: REG_DWORD
Value: 1=Enablethis key, that is DISABLE TaskManager
Value: 0=Disablethis key, that is Don't Disable, Enable TaskManager
As part of the enhanced management available in Windows 2000 and Windows XP, rather than risking a registry change, as an administrator you can enable or disable Windows 2000 Pro or Windows XP Pro's TaskManager using Group Policy Editor. This can be applied to the local policy. Note: if you are trying to override your organizations group policy, you can't. As soon as you re-authenticate to the domain, the domain or OU Group Policy will rewrite the registry setting. But if the TaskManager was accidently disabled or you need to control this item for a set of standalone boxes this is for you:
Click Start
Click Run
Enter gpedit.msc in the Open box and click OK
In the Group Policy settings window
Select User Configuration
Select Administrative Templates
Select System
Select Ctrl+Alt+Delete options
Select Remove Task Manager
Double-click the Remove Task Manager option
And as I mentioned above, since the policy is Remove Task Manager, by disabling the policy, you are enabling the Task Manager.
for autorun.inf problem, script inflected, hardware problem accessing and to prevent infections form worm32.exe and trojan.exe
All content provided on this blogs is for educational purposed Only. All posts are properly credited to its respective author and will not be liable for any misuse, errors or omissions on this information nor for the availability of this information.


 presented with 2 options: purchase a WAU product key online or enter a WAU product key from a WAU retail package purchased in a store. Choose Enter a WAU key.




 Note: Uninstall update or hide(if not yet installed) KB971033 from Windows Update





